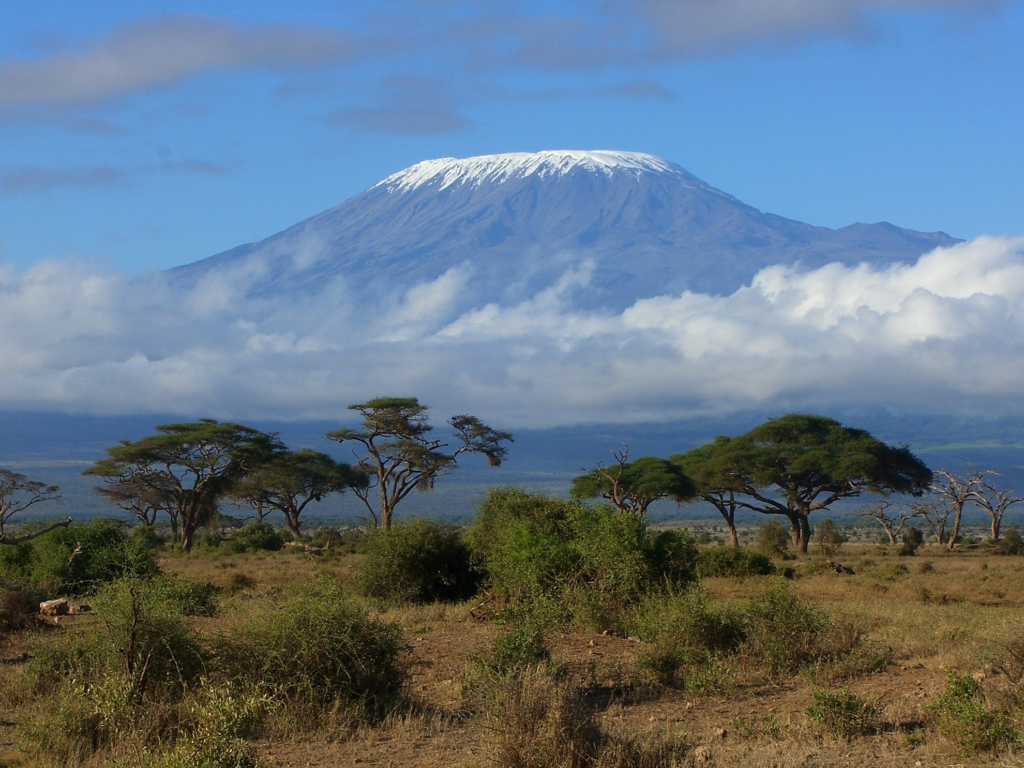
I’ll be hiking in Tanzania in Aug 2022 and attempt to climb Mt. Kilimanjaro. At 5,895 meters (19,341 ft above sea-level) Mt. Kilimanjaro is world’s tallest free standing mountain, that means its not part of any mountain range, it just is there – all by itself formed by volcanic eruptions some 1.9 to 2.5 billion years ago. It is one of the rare high altitude hikes that does not require any technical climbing knowledge – no ropes, no rappelling, no crampons, no special equipments, just an able body and determined mind to walk the walk. What makes this walk tricky is as you climb up the oxygen in air you breath becomes rarer, according to ‘Altitude to Oxygen Chart‘, at summit, you have about half the oxygen available in air compared to what we breathe normally at sea level.
Why am I climbing this mountain?
There isn’t one reason for me to climb this mountain – if you need one, I think George Mallory described it the best – “because its there”.
Anyways, I’m making this trek to become ‘experience rich‘, take a bus in Africa, meet local people, try to learn about their lives, eat local food. I’m hiking because I want to challenge myself and find my limits – physically, emotionally. With my compromised knees – do I have it in me to walk ~49 miles on the slopes for 7 days, in thin air, deal with the Acute Mountain Sickness (AMS) symptoms & possibility of High Altitude Pulmonary Edema (HAPE) or High Altitude Cerebral Edema (HACE), can I endure 7 hours of climb on summit night in frigid cold and harrowing winds, can I unplug from rest of the world for 10 days.
And then how else would you experience standing atop highest point on a continent to witness the sunrise with all the clouds and rest of the continent at your feet – only one way, DO IT.
What next?
I’ll write mini blogs about preparation, the tour company I’m working with for the climb, the medications, vaccinations, leave links and my shopping list for the trek.
Once am back, I’ll post about the actual hike, experiences, photos – check back regularly if you are curious. Feel free to reach out to me, if you have questions.
I hiked all the way up to Uhuru Peak on Aug 7th 2022. This post is all about how I prepared for the hike, what items I packed, what meds I used (& why). At the outset, Mt. Kilimanjaro is NOT a technical climb, you can “hike” to all 3 peaks atop – Gilman’s point (5,686 meters), Stella Point (5,756 meters) & Uhuru Peak (5,895 meters).
Best time to climb the mountain
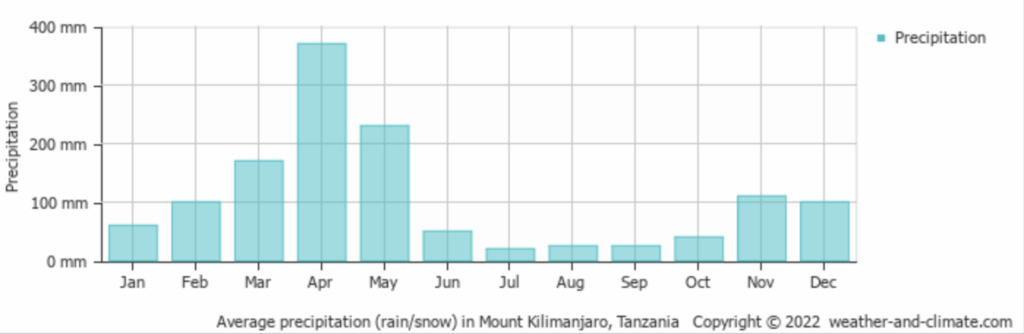
Based on the twice-a-year rainy season in Kilimanjaro region, planning your hike in July, Aug, Sept (& maybe Oct) would be best – you are less likely to encounter the rains and snow on the mountain.
Given the rainy season has just ended, the mountain provides a good supply of fresh water through streams and melting ice. A source of fresh water makes the life of your porters and support crew a tiny bit easy (these superheroes carry water from streams on their backs and heads to your campsite & provide you with warm & filtered water for you)
Preparing/training for the hike
You should start training for the climb at least 2 months before the actual trek. Frequent, 5-6 miles walks on moderate inclines with added weights (~20 lbs) is your best prep. Walking 4 to 5 consecutive days at least 2 times during the leading 2 months to the trek will prepare you for the long walks in the Kilimanjaro National Park. I used this adjustable weighted vest for my walks, I did not ease into adding weight – just started with all 20 lbs (just me, I prefer step changes rather than gradients!). If you live near mountainous region – doing a 8-10 mile trail with steep climbs will be very helpful to get you thinking about summit night. For me, I live in Massachusetts, so mountains in New Hampshire, Vermont are within driving distance. While these mountains are in 1200 to 1500 meters range – they provide excellent training for terrain, climb up & down and the distances. If you are in New England region, I highly recommend doing Mt. Lafayette loop at least two times in last month leading to your hike. This is about 9 miles loop providing excellent opportunities to get in the nature, face icy winds, rough terrain & just endless inclines. I climbed Mt. Monadnock 3-4 times in last couple of months leading to the trek – this is relatively shorter hike but provides excellent training for continuous uphill climbing – a mini version of summit night. Besides this and in general, maintaining a healthy diet is a good practice – Kilimanjaro or not :). You should do ALL your training and walks in the hiking boots you will use on actual climb, do NOT use sneakers or other foot-ware for training. The boots need to be broken into, your body must be adjusted to how the hiking boot provides you support for your specific way of walking & climbing. I have no specific recommendation for the hiking boots – Timberland, Columbia, Merrell have all good products – just chose any that suits your style, budget & make sure it provides good ankle support and is waterproof.
Items to carry with you
Your hiking company will provide you a packing list – but remember the basic rule “carry the things you need and will use” & “drop the things you want and will not use”. In most cases you will not carry your entire “hold all” (a large duffle bag with all your stuff), a porter will carry that on their backs – be considerate to them & don’t pack things that have no use in the mountain. Most companies will provide equipment rental option as well, so decide what you are comfortable renting Vs owning. For me, I rented the sleeping bag & carried everything else. While I had purchased a really good sleeping bag, it just became too bulky when I was packing for the trip, so I left it home.
I bought these moisture wicking shirts that I used as base layer with a short-sleeved shirt on top. This serves both as a protection against cold but from unrelenting sun during the day hike. These shirts worked great for all days leading upto summit night, for summit night (& possibly a day before, depending upon your tolerance for cold) – I used these compression shirts, they provide closer-to-skin heat retention. For bottoms, I went single layer for days leading to summit night but used these compression bottoms for summit night as base layer and added hiking pant on top as second layer. For non-summit days, you will not need a down jacket but having a thick fleece and/or a wind-breaker jacket will be very useful. You start walking around 8 in the morning & end up gaining altitude during the days with varying degree of wind, so it does help to start the day out with a fleece/wind-breaker on you, as sun climbs in the sky & you become warm, shed the jacket and pack it in your day pack. For summit night, you absolutely need a down jacket, a ski-pant and woolen winter hats to protect your head. I don’t have a specific recommendation for either – but any down jacket with 650+ fill-power is good enough. To protect your head – any woolen winter hat that covers your forehead and your ears is a must. On my summit night, we were welcomed by the mountain with ~60 mph winds with 15 F ambient temp – but I was able to enjoy the hike, get mesmerized by the spectacular views without shivering or feeling cold. Besides these I used 1 long pant and 1 long sleeved cotton T-shirt as my sleeping attire.
Starting from Day 1 – at campsites, the evenings and nights are cold, even for someone who is used to New England cold – it did feel cold, so layer up for the evenings and nights. The strategy I used for staying warm during nights was – after the day’s hike is over and body cleanup, I put on the next days base layer clothes & added the sleepware on top – thus getting layered for the evening/night & on next morning before breakfast, just remove the sleepware & get ready for the day. This allowed me to save time in the evening and mornings while enjoying the the surroundings.
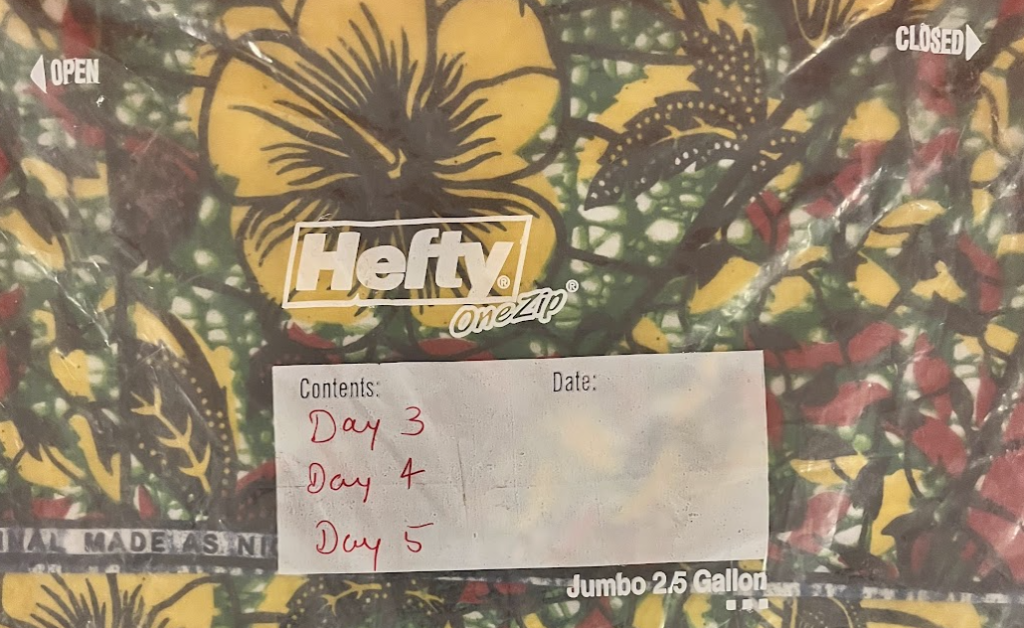
For packing, I highly recommend “compartmentalized packing” i.e. take 2.5 gallon jumbo Ziploc bags & pack clothes based on days in those – makes it really simple to pack, track and helps keep the clothes dry. Here’s how my Day 3, 4 and 5 bag looked like.
Others essentials include … (I not promoting these products – I don’t get kickbacks from sellers/manufacturers, I’m just providing links to what I used)
Aquatabs – these tablets treat and disinfect water, you just drop a tablet in water bottle & let it sit for 20-30 mins & then you can consume water. I used this as added protection on top of whatever treatment was done on the water.
Socks: Bring plenty – while I never felt need to double-layer socks, you may.
GPS enabled watch: Not required, but I used this for tracking other health vitals
Sun-block, lip balm: I don’t use these, but am told they are very useful to some.
Tooth brush & paste: Carry travel sized paste.
Underwear: you know what works best for you.
Extra AAA batteries or of appropriate size for your headlight. Altitude and temperatures can cause accelerated deterioration of batteries – so carry spare ones, you don’t want to be climbing in the dark.
Food
The trekking company does a great job at feeding you & feeding all the right things, so don’t go overboard with food. I carried about 25 home-made bars with nuts & dates and shared those with everyone around & that’s all! But remember, my caloric requirements are different that yours – so carry energy concentrated foods or foods with more sugars, if you need those. I drank less-than-optimal water (my mistake), but do consider carrying either the bladder in backpack or bottles so you consume at least 2 liters of waters every day.
Medications
I’m not a physician – so this is not a medical advise, just what I followed – please consult your physician for your specific needs.
Malaria: Lower altitude places in Tanzania host the Anopheles mosquitos that carry the malaria, but Arusha, where I lived does not report any malaria cases over last 3-4 years and the town-people proudly claim – no need to worry about malaria infections in Arusha. Your consulting physician will determine the prescriptions for you. The side-effects of malaria prescription, at times, appear similar to altitude sickness – this may confuse your guide – if you need to start descending right away (because of altitude sickness) or these are benign malaria medication side-effects – so decide wisely. I did not take any malaria medication (based on advise from my consulting physician)
Altitude sickness: I highly recommend taking Acetozolamide – branded popularly as Diamox. I started this medication – 2 tabs a day, one with breakfast and one with lunch – one day prior to climbing over 3000 meters. It works by slightly reducing pH of your blood, thereby instructing brain-stem to increase your respiration rate – thus while there’s less O2 in the air, you are taking in more breaths to allow lungs to extract enough of O2. Conscious rapid breathing does not work, you’ll pass out soon (try it!), your reptile brain needs to be tricked into thinking faster breathing is necessary for survival and slightly acidic blood does the trick. I stopped Diamox on summit night. The side effects included more urination & sometimes tingling in fingers (I did not experience the tingling, but I watered barren lands a lot)
Vaccination: I travelled to Tanzania via Kenya by road making my stay in Kenya slightly over 12 hours & the Tanzania rule requires you to have vaccination against yellow fever if your are traveling via some East African countries (Kenya included) and your stay in these countries exceed 12 hours. So before leaving US, I got myself some yellow fever & a yellow card telling authorities I’m vaccinated against Yellow Fever. Besides yellow fever, I used this opportunity to get vaccinated against Hepatitis A, Typhoid, Tetanus. I felt no side-effects from any of these.
Pain reliever, fever reducers: Take your pick, but do pick some – after long walks & potential altitude sickness symptoms – headaches being common, having a generic pain reliever is helpful. I used CVS branded 500mg acetaminophen & ended up taking 1 tab for 2 days towards the end.
Mt. Kilimanjaro is located in Kilimanjaro National Park in Tanzania. At 5985 meters, it is world’s tallest free-standing mountain. I hiked to the Uhuru peak (tallest point on the mountain) on Aug 7th, 2022. This post is about the routes and company I used as trekking guide.
National park manages the routes as “ascend only” & “descend only” (exception of rescue and re-supply). There are 7 routes you could take to the top of mountain …
Lemosho
Machame
Marangu
Lemosho – Norther Circuit
Rongai (starts in Kenya & approaches mountain from North)
Shira
Umbwe
These names correspond to villages/places where the starting gate in national park is located. I climbed the mountain via Norther Circuit route. Which route to chose is really a matter of personal preference and your readiness, some routes (Rongai e.g.) lets you get to top in 4-5. days (maybe even shorter) while others allow you to get there in 7-9 days. In general, you should consider longer duration routes to allow your body to acclimatize to higher elevations with lower O2 in the air. Other factor to consider, again based on your preference, is how busy the routes are. On our descend we passed through Barafu Camp and saw over 50-60 tents – thats busy! I chose the Lemosho-Northern circuit route for these 2 reasons (a) its the longest route allowing gradual height gain and excellent acclimatization hikes (b) its least crowded & you get to see the mountain from all 4 directions. Other important reasons to chose this route was the company I worked with – Team Kilimanjaro invented this route. A caution about this route is – starting Day 4 (really 3) – you are on north side of the mountain – a totally different perspective and landscape – northern side is “dry”, the mountain looks totally different, you traverse baron terrain – it is beautiful in its own way & you get to enjoy it all pretty much all by yourself. Advantage of this route is the base camp used (School Hut camp) is not used by a lot of other companies – making your pre-summit evening quiet and reflective – the views are spectacular and as bonus when you climb – you get to see all the main points on top – Gilman’s point, Stella point and Uhuru peak – some other routes skip Gilman’s point.
While there are many companies that offer services to help you get to the top of mountain, selecting a good partner company will save you stress & trouble on the mountain. I highly recommend Team Kilimanjaro, John Rees-Evans, the founder is a veteran mountaineer, having climbed around the world and holding a few records to his name, John is just wonderful to deal with. We had nothing but positive experiences dealing with John & the TK staff. John pioneered the northern circuit route & established the trails and camps used by TK & now many other followers.
In general, whichever company you chose – will have about 2 guides for your party and a number of support staff/porters. Tanzania government limits weight carried by each porter to the mountain to 20 KGs, so how many porters are part of your team depends on the company, equipment and your personal load. The porters the unsung heroes of the mountain, they each carry 20 KGs on their backs, start just after you & reach before you at next camp site and have the setup ready by the time you arrive – all with a smile on their face and “Jambo” (‘hi’, ‘hello’ in Kiswahili) & “Hakuna Matata” along the way. Typically a chef/cook and a butler will be part of the support staff. You’ll be provided 3 meals a day – a breakfast (porridge, eggs, toast, fruits), lunch and dinner (a soup, main course, fruits). TK provided us with snacks (popcorn, roasted peanuts) upon arriving at campsite. Victor, our chef and Errasto out butler were fantastic – the recipes Victor used were inspiring & knowing they had access to most basic of tools on mountain the food tasted even more delicious. A personal caring touch was – in the middle of morning hike on Day 2, Victor waited for us with ginger tea & biscuits – that fueled our climb for the morning. The guides are very well trained, Julius and Edwin, for me, are my ‘friends in Tanzania’. In many ways, you are trusting your well-being with the guides – so chose a company of good reputation, the dollars you may save with cheaper operators may not be worth the headaches (literal and figurative) later on.
Becoming guide on the mountain is akin to getting the ‘top post’ in a company. Guides are required to join a “college” and learn all about customer service, mountain safety, weather, first-aid and a whole lot of other things. Most guides start their job as a porters, climbing up the ladder to becomes senior porters, butlers, assistant guides and then guides. During my climb, Julius our guide while carrying his own load, helped another porter who was not able to keep up the steep incline and the weight he was carrying – so guides are expected to have mastered all aspects of mountain climbing & Julius (& Edwin) both clearly showed us they were.